When Can You Cook Chicken from Frozen? Safe Methods Explained
Discover safe, practical ways to cook chicken from frozen. Learn oven, stovetop, and pressure-cooker approaches, plus timing, temperatures, and tips to keep poultry juicy and safe.

Yes—it's safe to cook chicken from frozen using proper methods. The fastest result comes from baking or pressure cooking, while stovetop cooking requires longer times. If you're pressed for time, choose a method that minimizes uneven heat. The key is reaching 165°F internal temperature and following safe-handling steps. This snippet helps answer 'what's safe and feasible' when you can't thaw.
Can you safely cook chicken from frozen?
According to Cooking Tips, you can safely cook chicken from frozen using tested methods that balance safety and texture. If you're wondering when can you cook chicken from frozen, the answer is yes, you can, as long as you use methods that drive the meat through the danger zone quickly and reach a safe internal temperature. Frozen chicken tends to cook unevenly if heat is applied slowly or from a frozen whole bird. Small cuts thaw faster and cook more evenly; bone-in portions take longer due to density. For weeknight meals, thawing overnight in the fridge is ideal, but when time is short, cooking from frozen is a practical option. This is especially true for boneless breasts or thighs, which cook more evenly than whole birds. Regardless of the method, start with a clean surface, separate pieces if possible, and avoid stacking pieces so heat can circulate. The Cooking Tips team suggests planning ahead when possible, and recognizes that frozen chicken is a real weeknight helper.
Understanding the science: safety and temperature
Safety basics hinge on reaching a safe internal temperature quickly. Bacteria that cause illness grow fastest in the so-called danger zone between 40°F and 140°F; the longer meat sits in that range, the higher the risk. When you cook from frozen, you extend the time heat must travel to the core, so precise cooking becomes even more important. The goal is to reach 165°F (74°C) in the thickest part of the meat and keep it there long enough to destroy pathogens. Do not rely on color or texture alone. Use a calibrated meat thermometer and check multiple spots, especially in thicker cuts. Cooking Tips analysis emphasizes consistency of heat and piece size as key factors: smaller pieces cook more evenly, and steady oven or pan heat reduces hot spots. If you’re unsure about doneness, keep cooking in short increments and recheck with the thermometer.
Thawing vs. cooking from frozen: what's recommended
Thawing overnight in the fridge is the gold standard for most chicken cuts. It maintains texture and reduces overall cooking time. If time is tight, you can use the cold-water method: seal the pieces in a leak-proof bag and submerge in cold water, changing every 30 minutes. Small boneless pieces may thaw in under an hour, while larger cuts can take several hours. For the rare situation where thawing isn’t possible, you can cook from frozen using gentle, even heat and a meat thermometer to confirm doneness. The key is avoiding heat spikes that create uneven cooking and potential cold spots in the center.
Oven method: cooking frozen chicken in the oven
Preheat the oven to a moderate-to-hot setting to promote even cooking. Arrange chicken pieces on a foil-lined baking sheet or a rack to allow air circulation. Lightly oil and season the surface to taste, and avoid overcrowding so heat can reach all sides. Bake until the thickest part reaches 165°F, checking with a thermometer in several spots. Larger, bone-in pieces will take longer than boneless cuts, so be prepared for longer bake times. For extra moisture, you can baste halfway through or add a splash of broth. Allow the meat to rest a few minutes before slicing to retain juiciness.
Stovetop/skillet method: cooking frozen chicken on the stove
Heating on the stovetop involves adding a thin layer of oil to a hot skillet and searing the outside to set the surface. After searing, reduce heat and cover to finish cooking through the center. Expect longer cook times than thawed meat, and check doneness with a thermometer. For thinner slices, 3–5 minutes per side is common; for thicker pieces or bone-in cuts, finish more slowly and use the lid to trap heat. This method yields a quicker finish than the oven for small pieces but requires careful monitoring to avoid scorching.
Pressure cooker/Instant Pot method: cooking frozen chicken fast
Using a pressure cooker dramatically reduces overall time. Add a small amount of liquid as directed by your device’s manual, place the frozen chicken in, and set to high pressure. Cooking times vary by cut and size, but the pressure cooker typically finishes faster than the oven or stovetop. Always rely on a thermometer to ensure the center hits 165°F. After releasing pressure, let the meat rest briefly before checking again. This method is ideal when you need dependable results with minimal hands-on time.
How to prep for even cooking starting from frozen
Even cooking from frozen starts with breaking any clumps and separating pieces when possible. If pieces are stuck together, run cold water over the package or use a brief rinse if safe to do so according to your kitchen routine. Use even-sized pieces for uniform heat distribution, and space pieces so air can circulate. Preheating your cooking vessel and maintaining a steady heat source reduces the risk of hot spots. Keeping tools clean and dry helps prevent cross-contamination as the chicken moves from freezer to pan.
Safety and doneness: checking internal temperature
The universal standard for poultry is 165°F (74°C) in the thickest part of the meat. Use a calibrated digital thermometer and test in multiple spots, especially if your cuts vary in size or are bone-in. Let the meat rest briefly after cooking; temperature can rise a few degrees as juices re-distribute. Do not rely on color alone. If you see pink near the bone, verify with a thermometer before serving. Store any leftovers promptly within two hours of cooking.
Flavor, texture, and how to season frozen chicken
Starting from frozen doesn’t prevent flavorful results. Lightly oil or brush with your favorite seasonings, rubs, or marinades toward the end of cooking to avoid washing away moisture. For juicier meat, consider finishing with a brief rest and a final glaze or texture-enhancing rub. If you prefer crème or herb notes, adding them during the last 5–10 minutes can help lock in flavor without overpowering the chicken’s natural taste. Frozen chicken works well with simple weeknight sauces and quick sides.
Quick-reference times and a printable checklist
While exact times vary by cut and method, a practical reference helps. Use your thermometer as the final judge, not the clock. Prepare a checklist: preheat the oven or pan, arrange pieces with space, insert thermometer, verify 165°F, rest 3–5 minutes, and store leftovers promptly. For visualization, you can print this guide and keep it handy in the kitchen to speed up decision making during busy weeknights.
Tools & Materials
- Oven with rack(Preheat to 375-425°F depending on cut)
- Baking sheet or roasting pan(Line with foil for easy cleanup)
- Meat thermometer(Digital, with alarm if possible)
- Skillet or pan(If using stovetop method)
- Tongs or spatula(For turning and handling)
- Oil or nonstick spray(Helps even browning)
- Cooling rack (optional)(Promotes even heat if using the oven)
- Seal-able bag or container(For quick thawing if needed)
Steps
Estimated time: Total time: 60-90 minutes
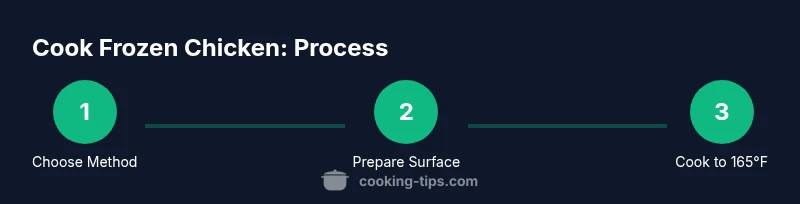
- 1
Choose cooking method
Decide between oven, stovetop, or pressure cooker based on time, equipment, and cut. Smaller pieces cook faster and more evenly; larger cuts may benefit from pressure or ovens for uniform heat. This step sets the whole approach.
Tip: Tip: For even results, pick a method you can consistently manage without interruptions. - 2
Preheat the chosen appliance
Preheating ensures the surface of the chicken starts cooking immediately, reducing the chance of soggy or underdone centers. For the oven, preheat to 375–425°F; for stovetop, heat the pan with a thin layer of oil; for pressure cooker, follow your device’s heat setting.
Tip: Pro tip: A quick preheat reduces the likelihood of uneven cooking right from the start. - 3
Prepare the chicken surface
Lightly oil or spray the surface and season or rub with your chosen spices. If cooking from frozen, do not rely on heavy marinades at the start, as moisture on the surface can hinder browning. Seasoning later can help, but minimal surface seasoning early is fine.
Tip: Pro tip: Salt helps with browning; avoid thick coatings that trap moisture initially. - 4
Arrange for heat circulation
Spread pieces in a single layer with space between them. In the oven, use a rack if possible; on the stovetop, don’t crowd the pan. Proper spacing ensures consistent heat transfer and reduces steaming.
Tip: Pro tip: Use a rimmed sheet to catch any drips and prevent cross-contamination. - 5
Cook until safe internal temperature
Cook until the thickest part of the chicken reaches 165°F (74°C). Check multiple spots if pieces vary in size. Use residual heat guidance and avoid overcooking, which dries meat.
Tip: Tip: Start checking early in the expected window and recheck as needed to avoid overcooking. - 6
Rest before serving
Let the chicken rest 3–5 minutes after cooking. Resting helps the juices redistribute for juicier meat. Slice against the grain for tenderness.
Tip: Pro tip: Resting makes a noticeable difference in texture. - 7
Check doneness again if in doubt
If you’re unsure, slice a piece near the bone or check a second piece with the thermometer. Doneness is safer when verified with a thermometer rather than relying on color alone.
Tip: Pro tip: When in doubt, finish with a few extra minutes at the same temperature and recheck. - 8
Serve or store safely
Serve hot or refrigerate leftovers promptly within two hours. Refrigerate in shallow containers to cool quickly and preserve quality. Reheat leftovers to 165°F if you plan to eat them later.
Tip: Warning: Do not leave cooked chicken at room temperature for extended periods.
Quick Answers
Can I cook a whole frozen chicken in the oven?
Cooking a whole frozen chicken is possible but not ideal for even doneness. It takes significantly longer, and the inside may stay undercooked if not monitored carefully. Consider thawing the bird if time allows, or cut into parts to help heat penetrate.
Yes, you can cook a whole frozen chicken, but it’s safer and more even when you thaw or cut into parts first.
Is it safe to use a slow cooker with frozen chicken?
Slow cookers can trap bacteria if the meat remains in the danger zone too long. For safety, thaw chicken before using a slow cooker or use methods that heat quickly to 165°F. Always follow appliance manufacturer guidelines.
It’s generally safer to thaw first or use a method that reaches 165°F quickly; slow cookers aren’t ideal for frozen chicken.
How long does it take to cook frozen chicken in the oven?
Oven times vary by cut, but frozen chicken typically requires more time than thawed meat. Use a thermometer to confirm a 165°F internal temperature rather than relying on time alone.
Frozen chicken generally takes longer in the oven; verify doneness with a thermometer at 165°F.
Can I season frozen chicken at the start?
Light seasoning at the start is fine, but deeper marinades may be more effective toward the end of cooking when moisture returns. You can also season after the initial sear to improve flavor.
You can season lightly at first and finish seasoning later for better flavor.
What should I do if I see pink near the bone?
Pink near the bone doesn't always indicate undercooked chicken. Always confirm with a thermometer; if below 165°F, continue cooking and recheck.
If you see pink near the bone, check with a thermometer and cook longer if needed.
Is it safe to thaw chicken on the counter?
Thawing on the counter is not recommended due to rapid temperature rise into the danger zone. Use fridge thawing or cold-water thawing with proper containment.
No, thawing on the counter is unsafe; use fridge or cold-water methods instead.
What internal temperature confirms doneness?
165°F (74°C) in the thickest part confirms doneness. Always verify with a clean thermometer.
Aim for 165°F in the thickest part and double-check with a thermometer.
Watch Video
Top Takeaways
- Plan your method based on cut size and time
- Always reach 165°F to ensure safety
- Use a thermometer and check multiple spots
- Rest the meat before serving for juiciness