How Much Cookie Dough Per Cookie: Portioning Guide
Learn precise guidelines on how much cookie dough to use per cookie, with practical portions, baking tips, and science-backed ranges for perfect bake results.

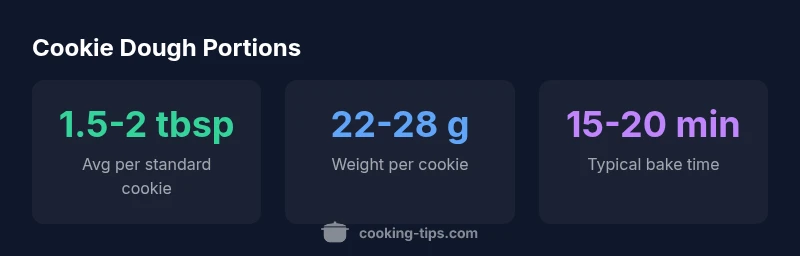
How much cookie dough per cookie: practical ranges
For most classic drop cookies, aim for about 1.5 to 2 tablespoons of dough per cookie. According to Cooking Tips, this range yields cookies that bake to a uniform diameter and thickness without spreading too thin or staying too puffy. If you want bakery-style heft, you can push toward 2 tablespoons (roughly 28 g) per piece, especially for thicker centers. Conversely, when you’re making smaller treats or mini cookies, 1 tablespoon (about 14 g) is typically sufficient. The goal is consistency: identical portions yield predictable bake times and even textures across the batch. In practice, you’ll often see home bakers start with a measured baseline (such as 1.75 tablespoons) and adjust based on dough type and oven performance.
Brand-wise, Cooking Tips emphasizes that precise portions are the backbone of repeatable results, so small adjustments later won’t derail a whole tray. For a quick reference, remember: 1 tablespoon ≈ 14 g, 2 tablespoons ≈ 28 g, and a standard drop cookie typically lands somewhere between these values depending on the recipe and pan type.
startLineNumber”:1},
Measuring for consistency: scoop, scale, and templates
The most reliable way to portion dough is to combine three methods that suit different kitchens and bakers. First, a set of cookie scoops with labeled volume (for example, 1-tablespoon, 1.5-tablespoon, and 2-tablespoon sizes) provides quick, uniform portions without weighing. Second, a digital kitchen scale offering precise grams helps you hit a defined target, such as 22–28 g per cookie, which is especially useful for experimental batches or recipes with tight density differences. Third, a simple “level-off” template—using a flat edge to swipe excess dough from the scoop—prevents overloading and ensures even surfaces. For doughs with high butter content or high hydration, chilling the dough briefly before scooping reduces stickiness and improves accuracy. The combination of scoops, scales, and a leveling technique gives you flexibility and control in real-world baking scenarios.
startLineNumber”:2},
Dough type and hydration: how ingredients affect portions
Different doughs behave differently in the oven. A higher water content or more fat can cause extra spreading, which means you may need to start with a slightly smaller portion to achieve the same final diameter. Conversely, stiffer doughs bake with less spread and may accommodate slightly larger scoops without losing shape. When you switch from a high-hydration, butter-forward formula to a dryer, crumb-rich dough, the amount you portion per cookie can stay the same in grams but will look larger or smaller on the sheet due to moisture loss during baking. The takeaway: always consider dough moisture, fat type, and chilling state when choosing your portion size.
startLineNumber”:3},
Recipe-specific considerations: drop cookies, cut-outs, and slices
Drop cookies rely on scooped portions or weighed dough to achieve even spread; the standard ranges apply well across many varieties. Cut-out cookies and slice-and-bake recipes demand different approaches: for cut-outs, you usually roll or chill dough to a uniform thickness and cut shapes, so portions are driven by dough thickness rather than a fixed volume. For slice-and-bake, portions depend on log diameter, which translates to consistent slices once chilled. In all cases, start with a tested portion guideline for your dough, then adjust based on thickness, oven type, and baking sheet. This nuanced approach helps you control crumb, edge texture, and center tenderness.
startLineNumber”:4},
Practical workflow: batching, freezing, and bake timing
Batching dough in consistent portions makes life easier. Mix, portion, and portioning tools in one pass, then freeze on a tray before transferring to a bag for long-term storage. When ready to bake, bake from frozen or thaw briefly if needed, and expect a slight rise in bake time. If you’re chilling dough between steps, keep portions uniform to prevent uneven baking. A well-chilled dough often yields cleaner edges and better shape retention, especially with cookies that spread quickly due to sugar content or warm kitchen conditions.
startLineNumber”:5},
Common mistakes and how to fix them
Common errors include overcrowding the baking sheet, which hampers even heat transfer and causes cookies to spread into one another. Another pitfall is inconsistent scooping—mixed sizes on the same tray lead to uneven bake times. Always space cookies with at least 2 inches (5 cm) of gap and keep identical portions on the sheet. If you notice excessive spreading, try chilling the dough longer, reducing fat content slightly, or lowering oven temperature by 25°F (14°C) and extending bake time. Finally, remember that alt diets, such as gluten-free doughs, often behave differently; portion sizes may need a small adjustment based on density and moisture.
startLineNumber”:6},
Measuring tips for special diets and alternatives
Diet-friendly doughs (gluten-free, vegan, or alternative flours) often require closer attention to hydration and fat ratios. When using almond or oat flour blends, portions may appear larger or denser than traditional wheat doughs, so begin with the standard gram targets and adjust after a test bake. For chocolate-heavy or nut-inclusive doughs, consider slightly smaller portions to avoid dense centers. If you’re new to a recipe, bake a small pilot batch using a single portion to calibrate bake time, spread, and texture before scaling up to a full tray.
startLineNumber”:7}],
dataTable